Click for full-sized image.
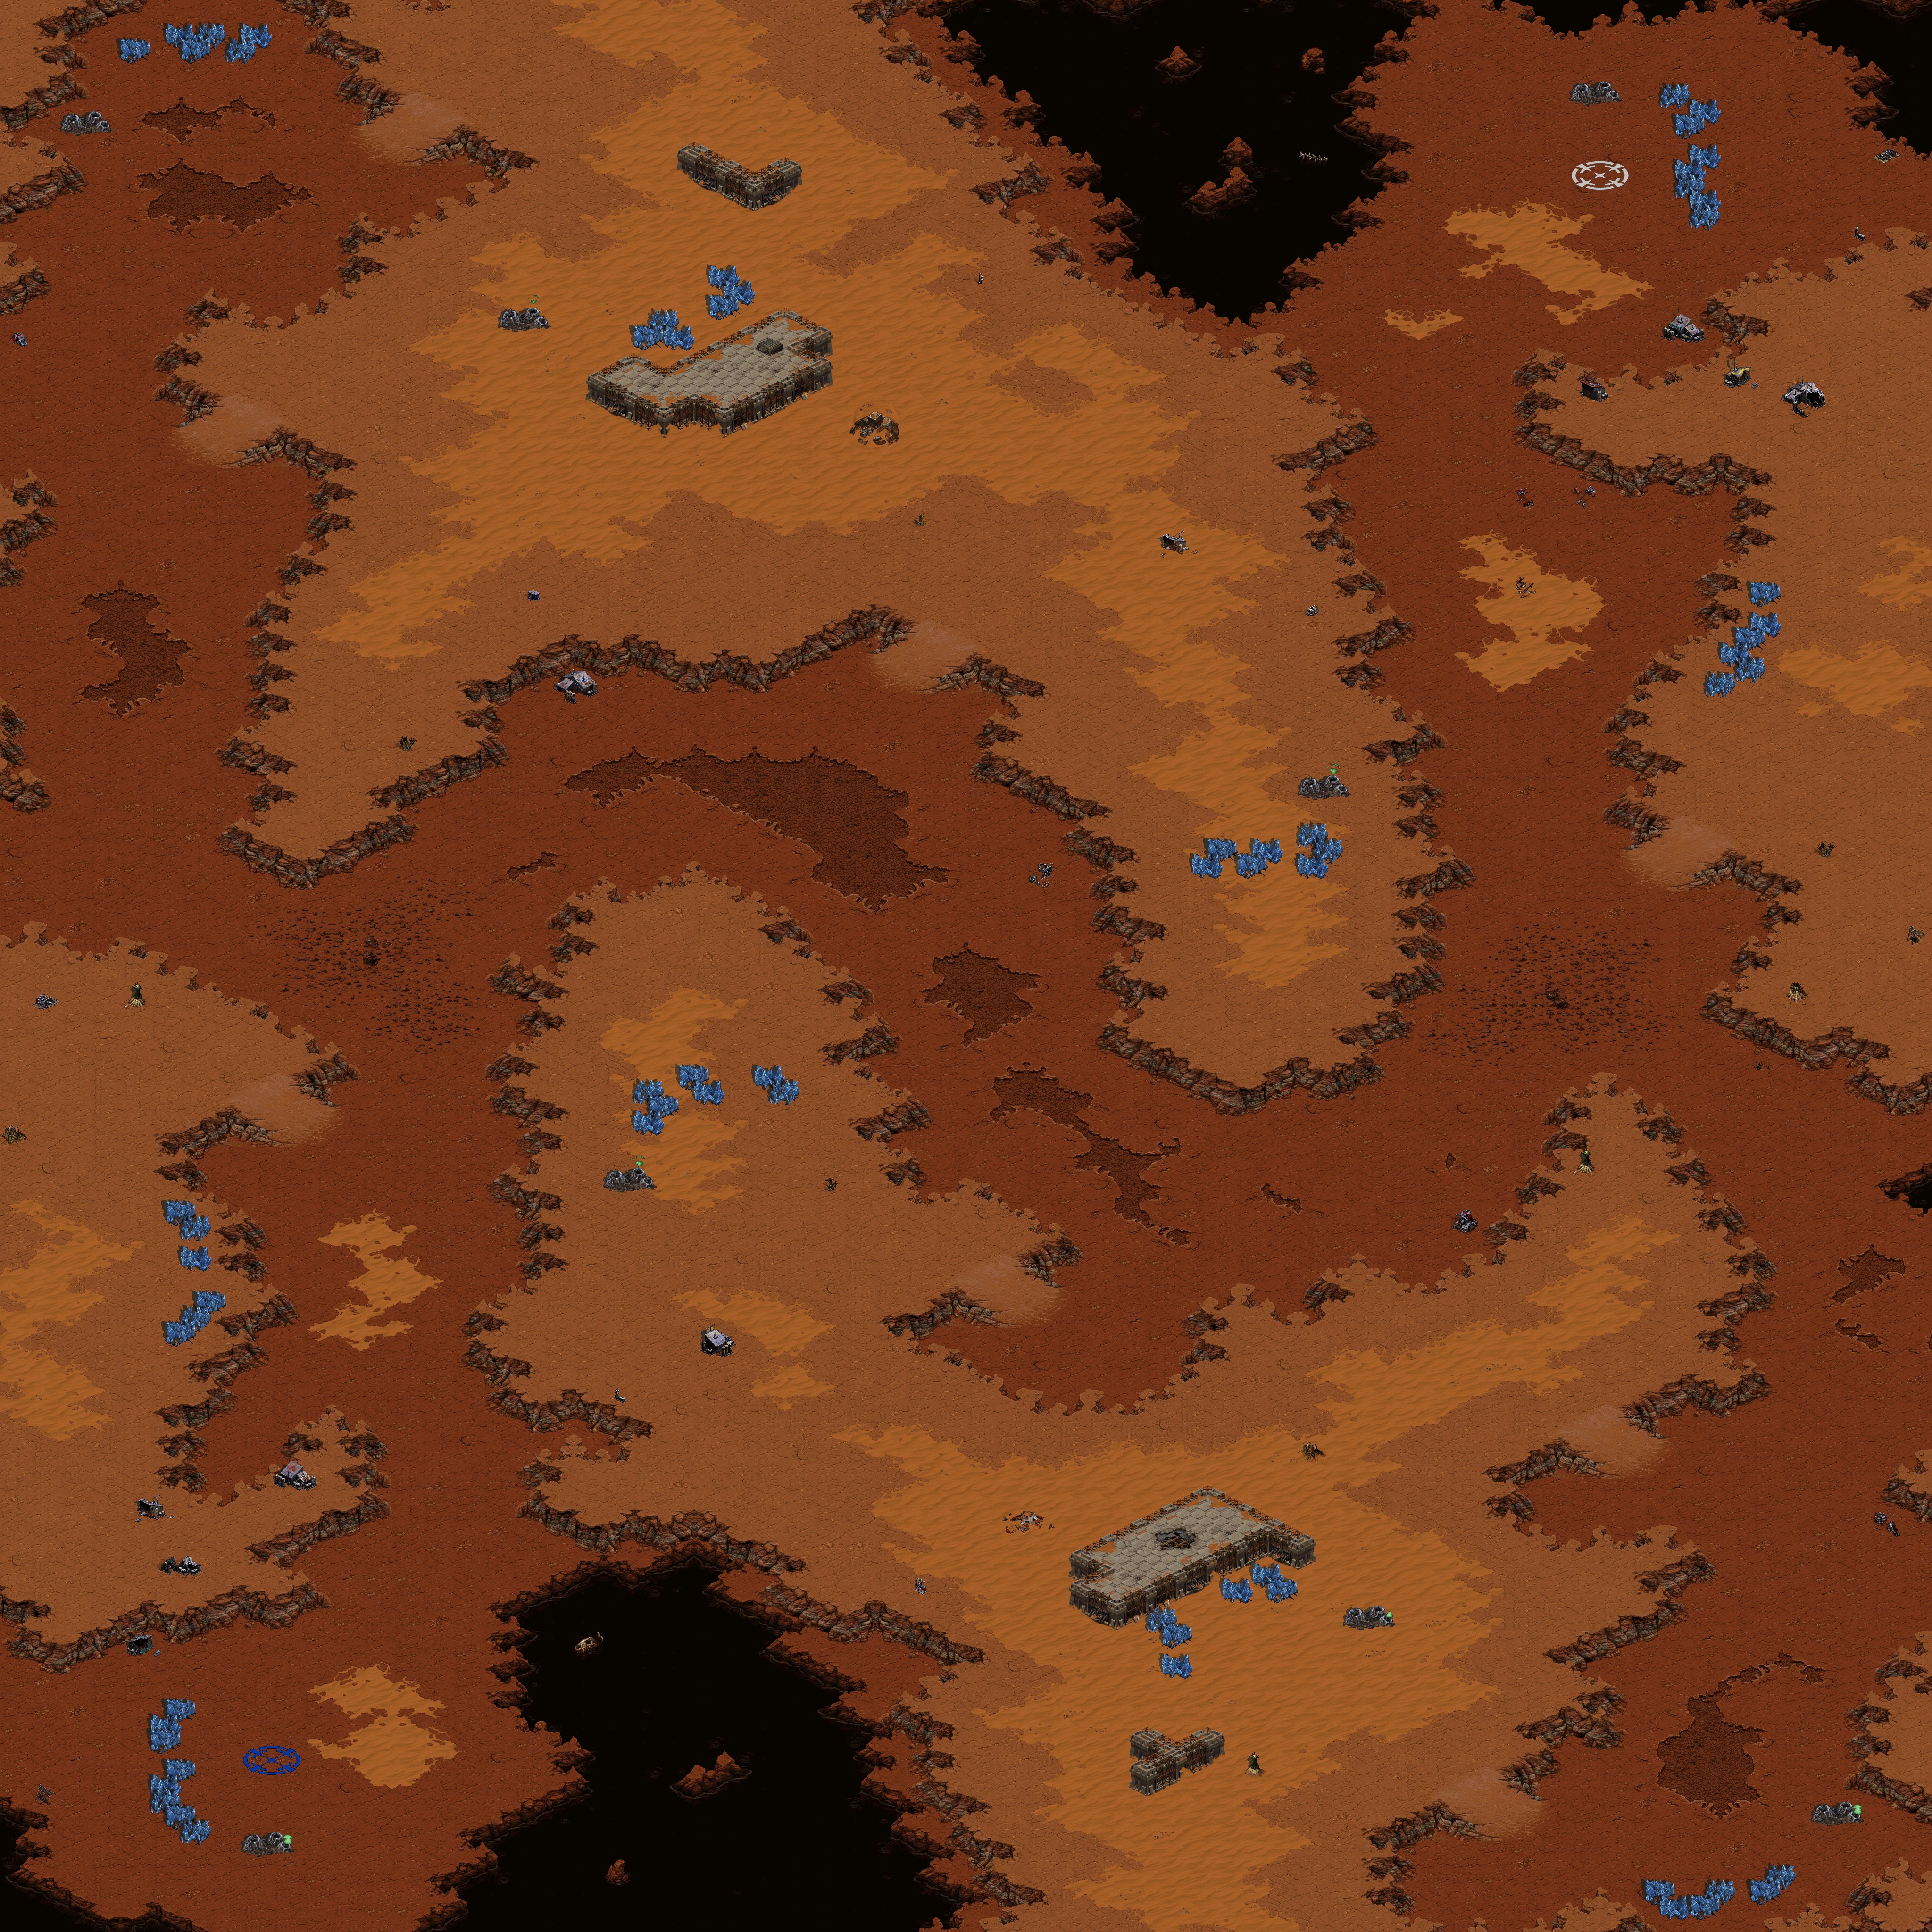
IntroductionA 1v1 multiplayer melee map. Design NotesThis symmetrical 1v1 map positions the players at opposite corners (1) of a square map. The main base position has only one canyon entrance that leads to an elevated, mineral-only expansion (2) before splitting off into the rest of the map. Players then face the strategic choice of centering their opening defenses on the main base, or risk extending into the single canyon entrance up to the ramp of their natural expansion and try to protect both (3). The rocky ground in the intersection prevents players from building static defenses any further while still blocking ground access to their main base. Every land path from one base to the other must pass through the snaking canyon (4). Controlling this point with elevated Siege Tanks or a burrowed ambush party is a viable strategy against ground attacks well through the mid-game as shuttling units around a small-to-medium sized map is inefficient. The map is dominated by two raised masses that offer several expansion locations, and either mass is reasonably accessible to both players. Of these, the expansions on the fingers (5) are slightly richer in ore and gas. Notice that the main bases and corner expansions which enjoy additional protection from the map boundaries are also on the lower ground level. Opponents have the option of attacking these areas from cliffs and ramps. One possible method for establishing a stronger base is to leave the starting position as if it were an expansion and place all higher tier structures on high ground in the natural expansion (2).
Click for full-sized image.
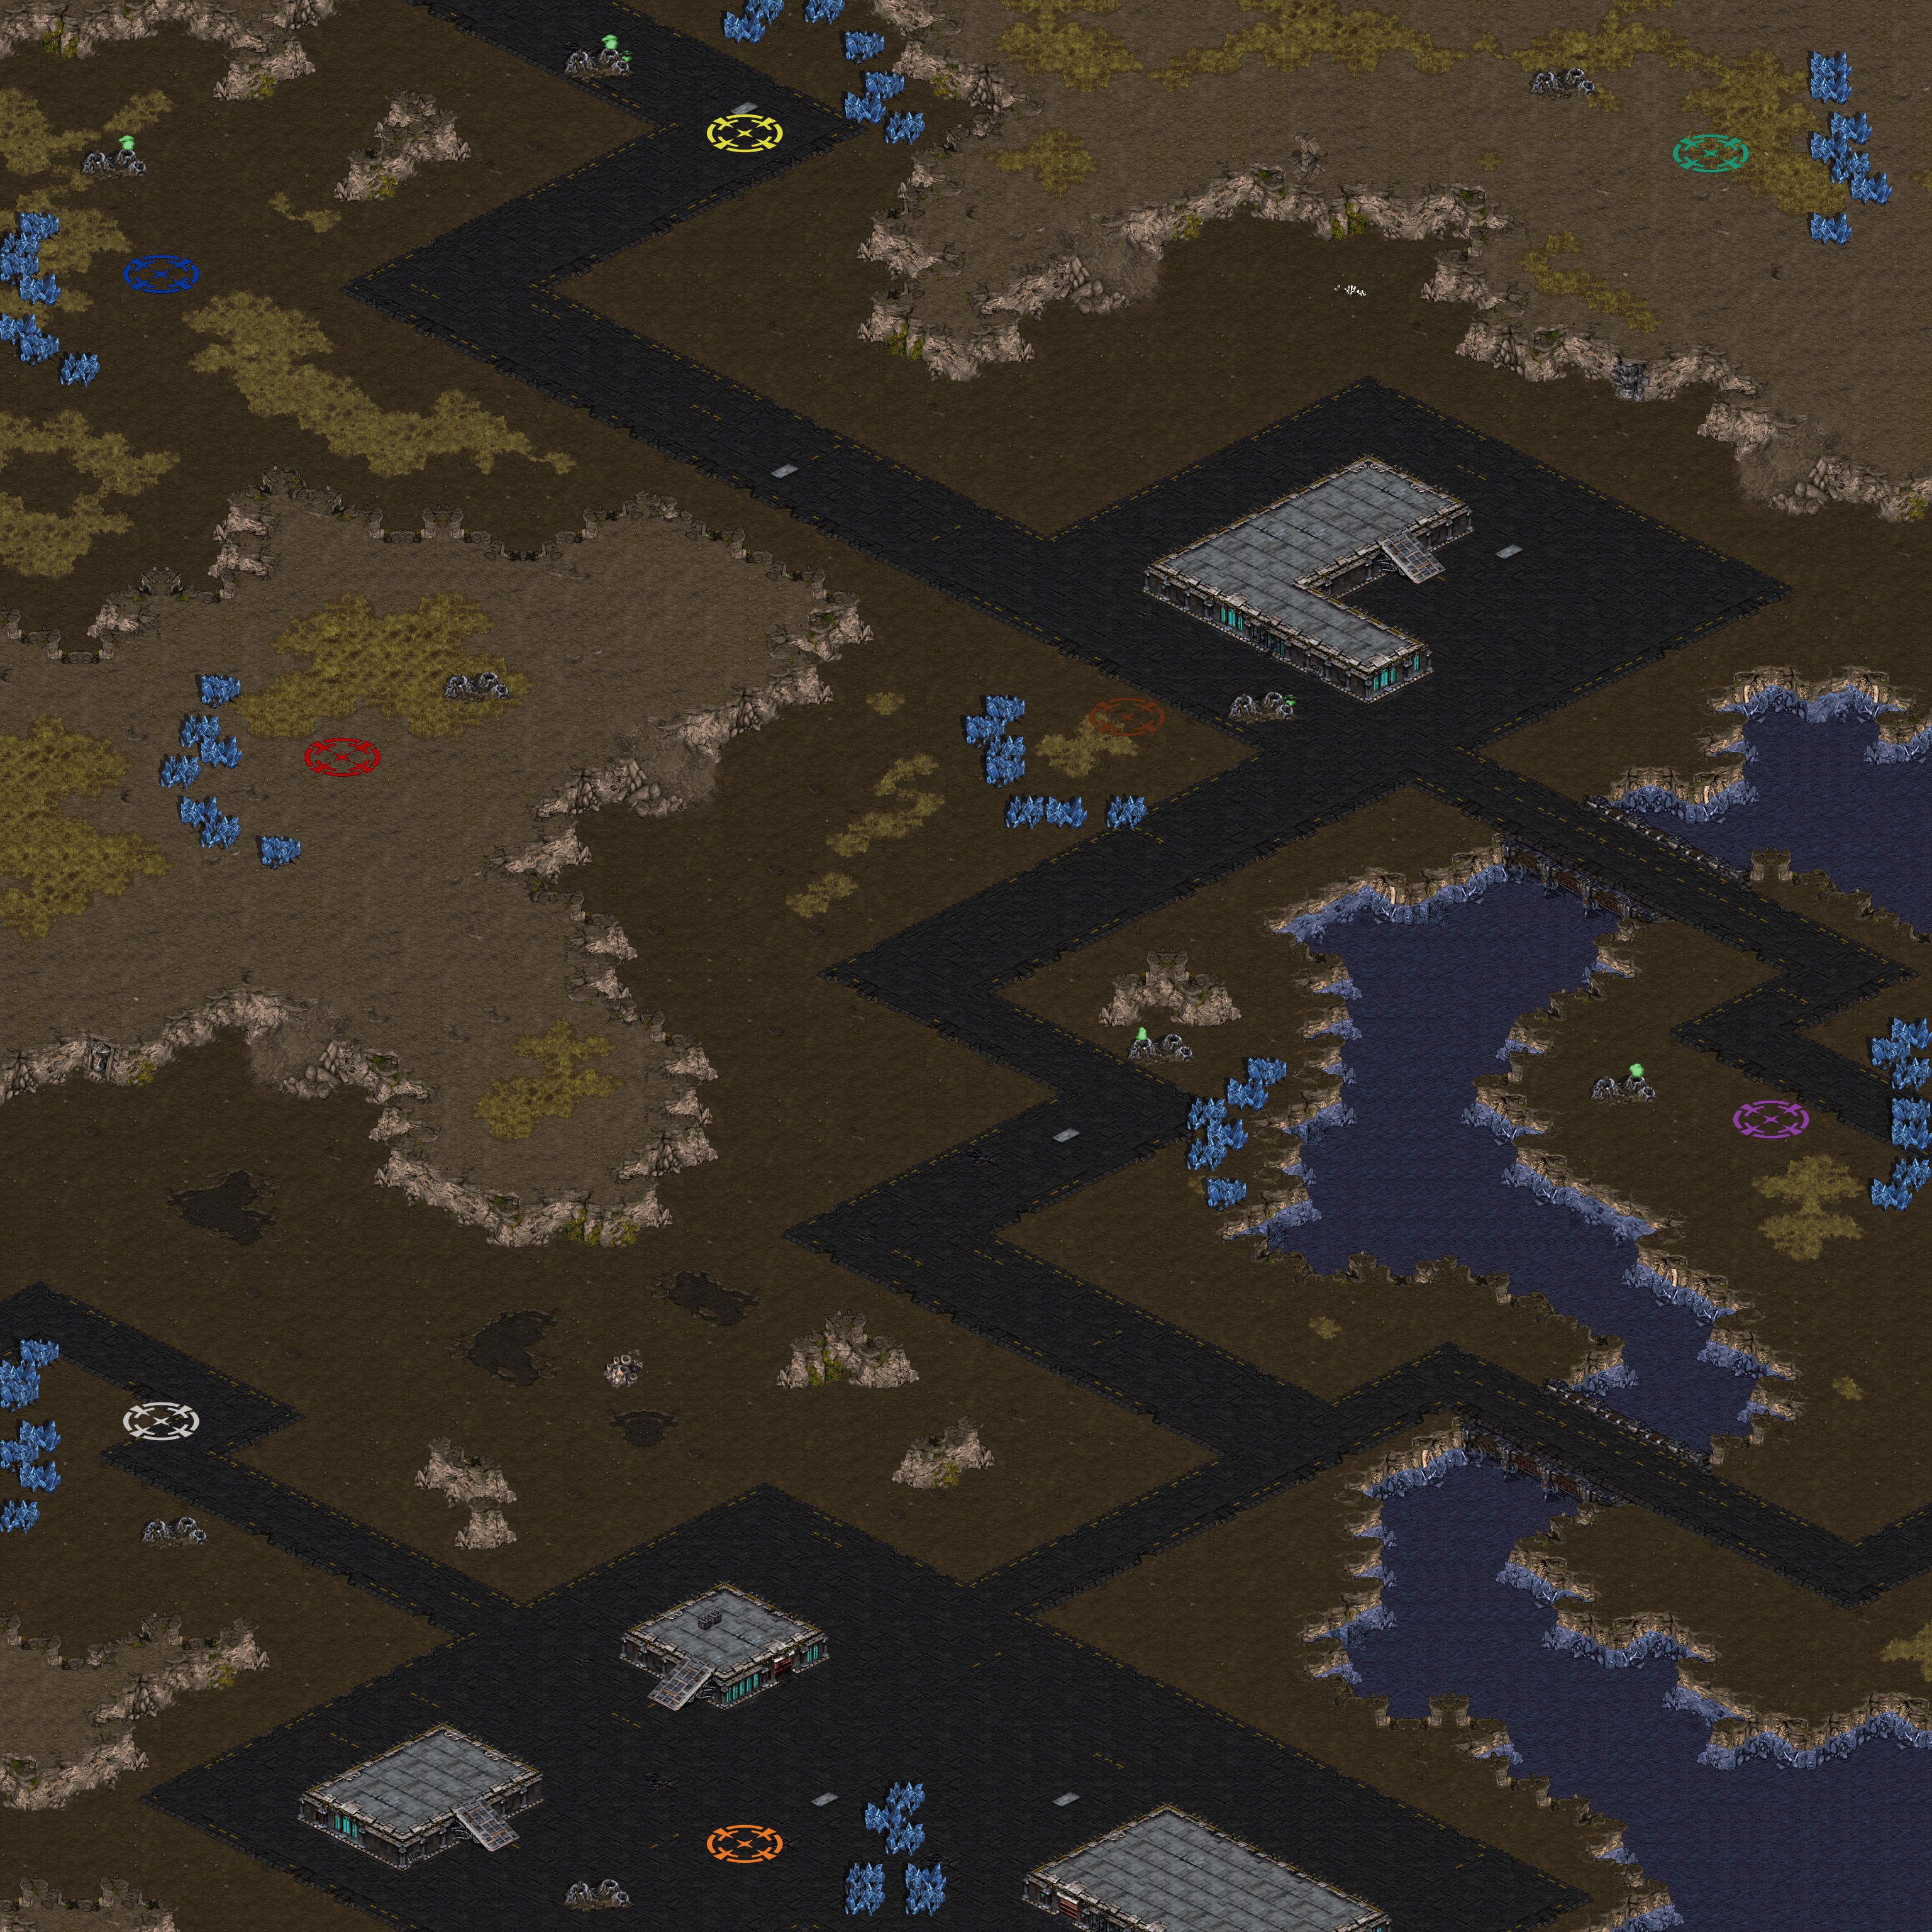
IntroductionA multiplayer melee map. Design NotesThis is an asymmetrical melee map that can host a variety of team games, free-for-alls, or cooperative comp-stomps. The tiny size and wide range in strength of starting positions makes it unsuitable for head-to-head. Brown has the least tenable position in the center (1) but is very close to the only gauranteed open expansion. Red and Teal enjoy elevated positions with ramps that are easily defended against ground attack. On the eastern island Purple can also protect against ground assaults by covering the bridges. Blue and Yellow in the north and White and Orange in the south are paired in very close proximity. If opponents begin in these paired positions hectic worker and tier 1 battles may break out early. What this map offers for melee that the stardard symmetric maps do not is variety. Consider 2v2 matches on this map and the interesting positions that might occur. One team spawning with a player at Brown might try to shore up the center position weakness by having the other player fast expand next to Brown and flip the center into a strong point. Or two opponents spawn at Blue and Yellow and duke it out early while their teammates from further out, maybe Teal and White, tech up and send reinforcements to the fight.

Click for full-sized image.
IntroductionA multiplayer melee map. Who else is living on your island? Design NotesThis is another asymmetrical melee map for friendly human versus human or cooperative play. The map is organized into islands that contain zero, one, two or three starting positions. Each base position has a generous deposit of resources so expanding isn't nearly as important as territorial control. Some islands may seem horribly unbalanced, but I claim that they are not. Suppose you spawn as Brown on the northwestern island, all by yourself. No one will bother you until they can attack by air or drop ground troops so there is ample time in isolation. What will you do? Go for the expansion? Prepare to attack another player? Though protected in isolation, Brown cannot hope for an increase in resource collection rate until teching to transports and grabbing an expansion. Consider then the Blue/Yellow and Purple/Teal pairings. On an island with two positions a player is facing a single opponent and one of them is likely to be destroyed before either base runs out of resources. The implication is that on this sort of island a fierce, low-tier battle will decide who gets the prize: a double resource island for themself. If the winning player utilizes anti-air capable units in his or her initial ground war then after securing the island he or she will be ready to deal with a player like Brown who has been quietly working towards transports or ships. Then there is the large island with a similar dynamic. There are three starting locations and by emerging victorious here a player can collect at triple rates with the benefit of close proximity, turning the island into a stronghold. However, in the one-on-one scenario it is in both players' interest to fight it out to the death as quickly as possible. On the three-player island moving first may be a mistake if the third player happens to attack you while you're extended. Then what? Waiting for the other two to trade some blows might help, but other islands will become little kingdoms after some time. These are just free-for-all musings. When playing a team game then all sorts of other interesting strategic starting positions are possible.
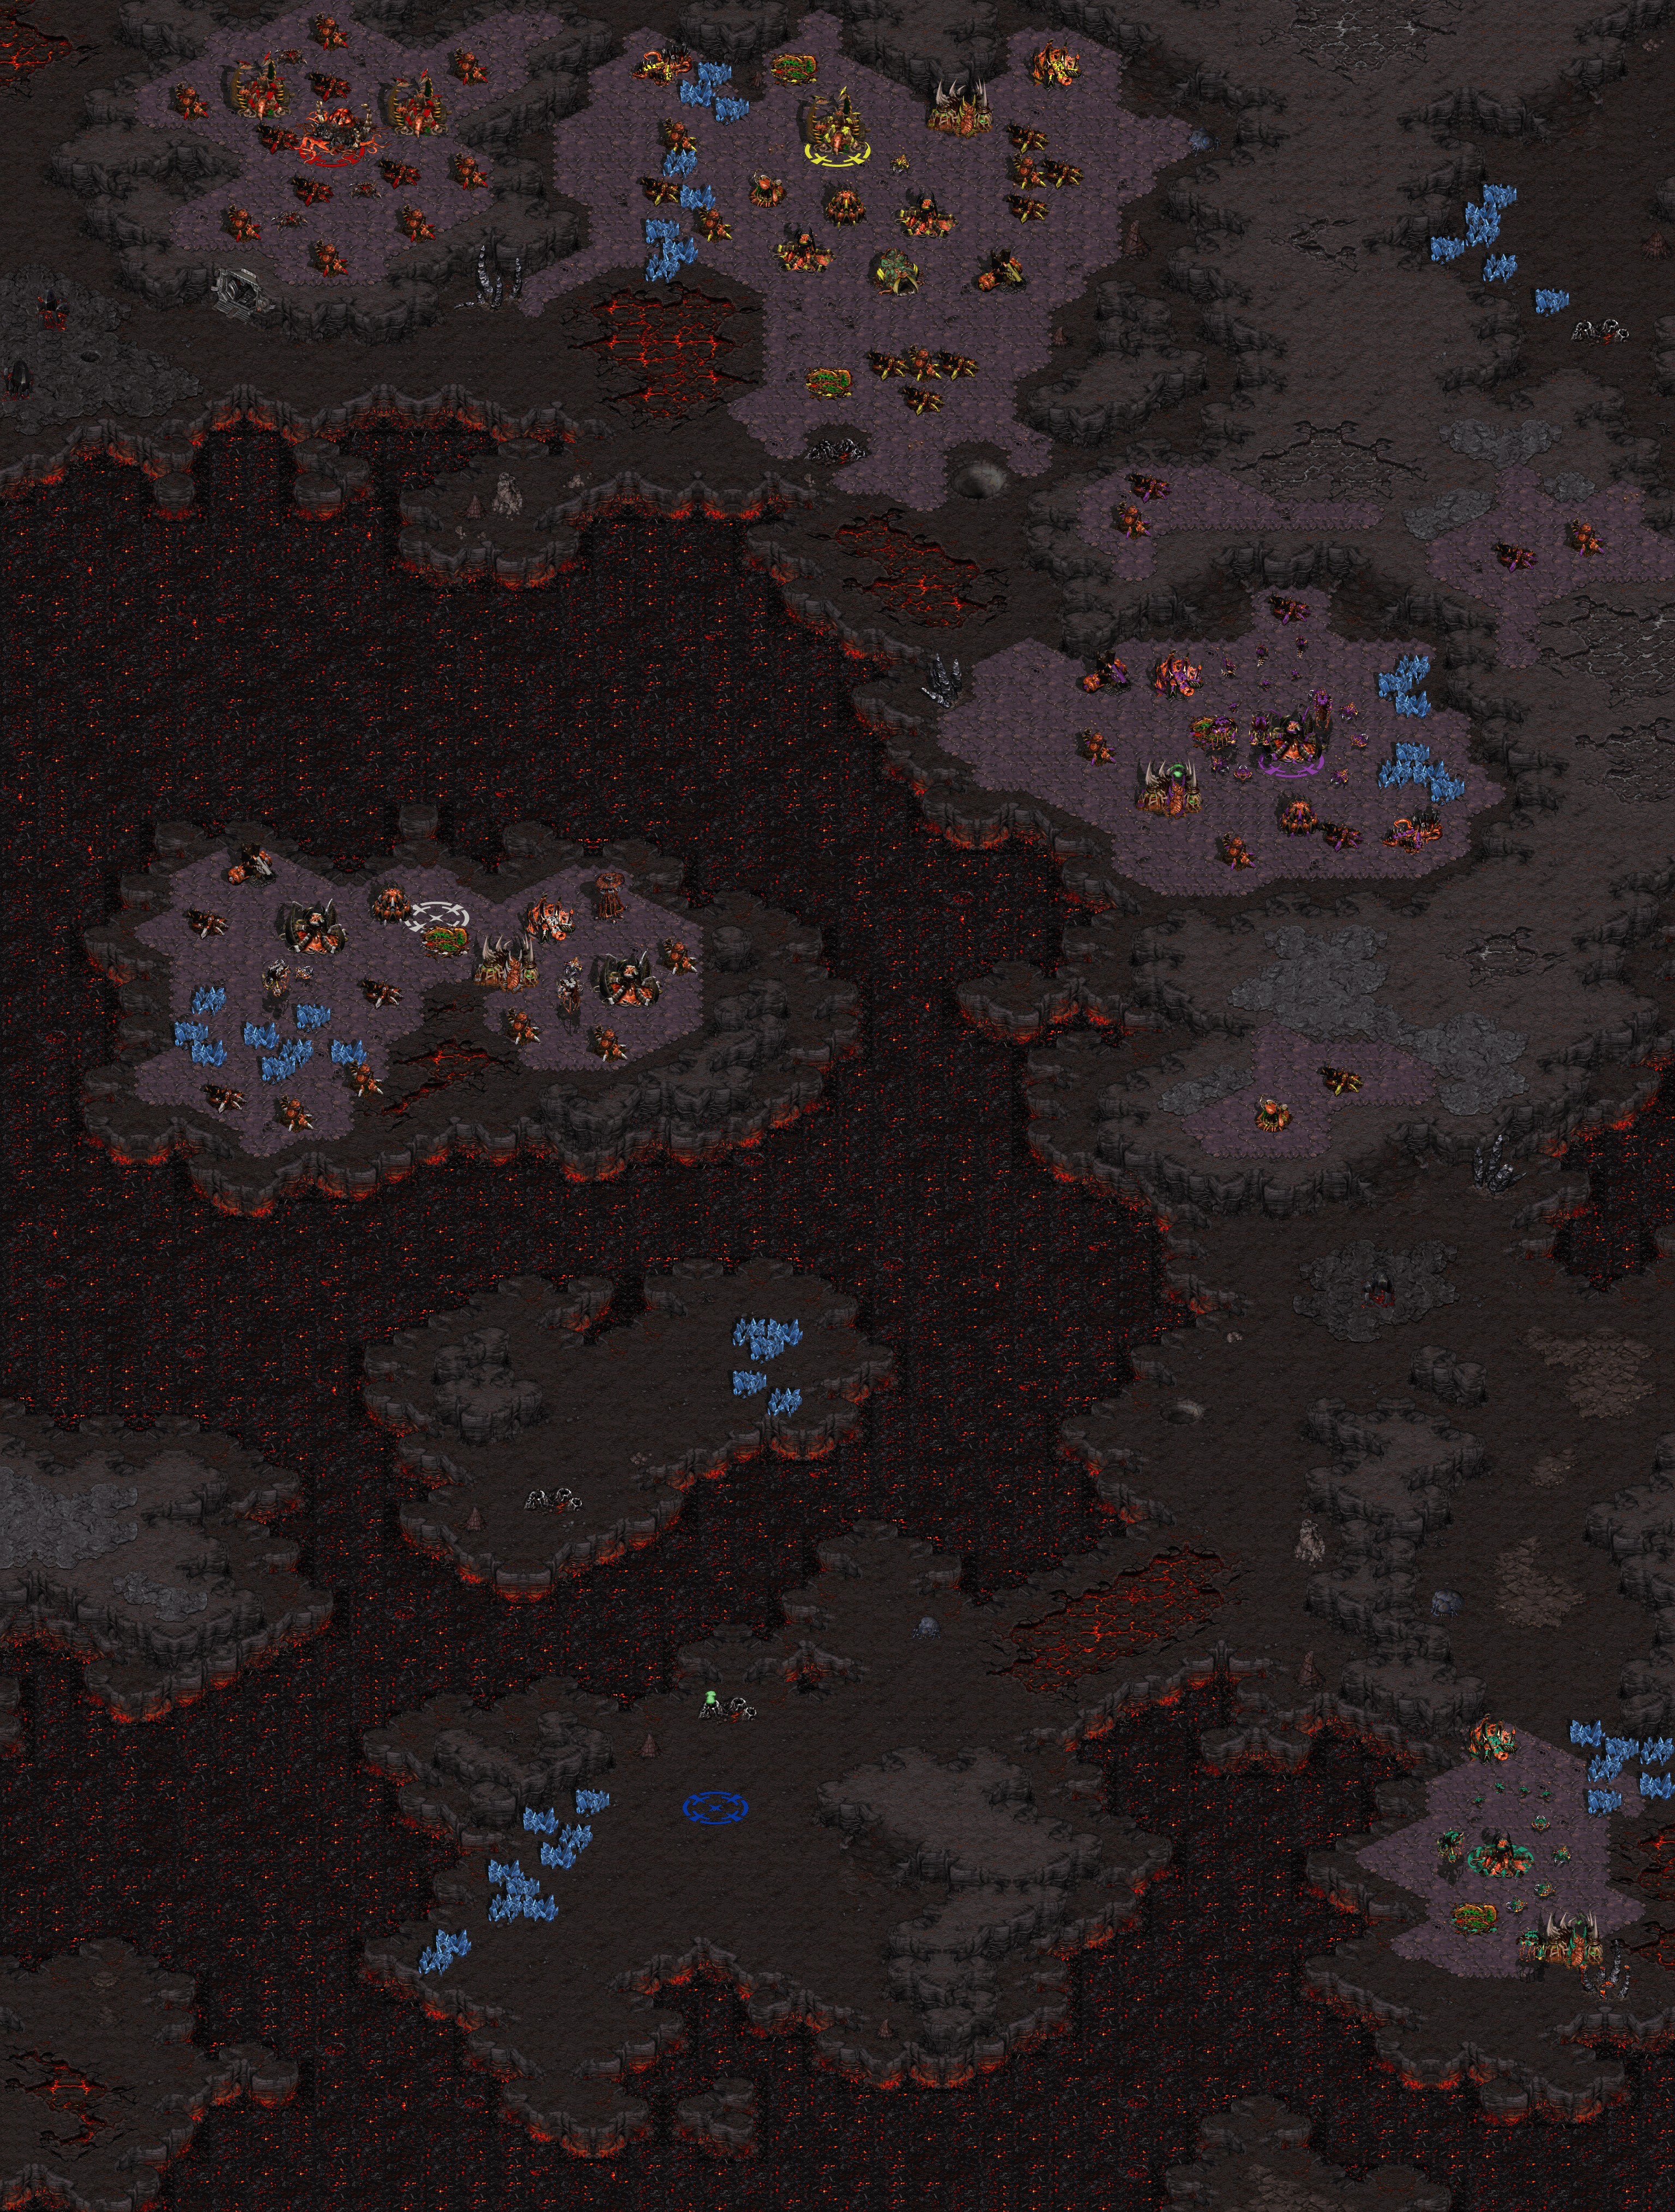
Click for full-sized image.
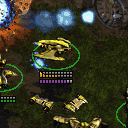
IntroductionI am the Overmind. You cannot destroy me. Design NotesIn this solo scenario the player chooses a race and has an unspecified beef with the Zerg Overmind. The only clue to what motivates the conflict is a transmission at the mission start from the Overmind, I am the Overmind. You cannot destroy me.The scenario ends in victory when the Red Overmind building is destroyed. The player is Blue and begins on an isolated penninsula (1). Early ground attacks will come from several enemies, but the Teal AI runs "Expansion Zerg Campaign Difficult" and is in close proximity (2) making it a good first target. In the midst of overwhelming this base the game will pause for a transmission from the Overmind that repeats the same taunting message from the start of the mission. Then a variety of burrowed Zerg belonging to Red will emerge and are intended to cripple if not eradicate the force sent to wipe out Teal. North over the magma from the player's starting position is an expansion and the White AI (3). White offers a tempting target when the player begins exploring the center of the map that is not reachable by ground. When the White base is mostly destroyed the Overmind will transmit its taunt again and then a three-pronged drop assault begins against the Blue main base. Red ground units and Overlords with a few Guardians to handle towers appear on small land masses in the south (4). The ground units board the transports and attempt to invade the Blue starting position which presumably protects important structures. Continuing by land from the starting position is a ridge guarded by a Yellow Nydus Canal outpost (5). This ridge overlooks the Purple base that can be accessed on foot by following the ridge around to the north and descending a pair of ramps. The Overmind again sends an assault when the Purple base has mostly fallen. It is a large airial fleet capable of fiercely targeting air or ground units and includes Scourges and Queens. The player does not have to defeat every AI opponent and consequently may not trigger each of the Overmind's counter attacks. Once the player destroys the Red Overmind building on a plateau guarded by the Yellow AI (6) the scenario ends in victory. Yellow is also running "Expansion Zerg Campaign Difficult" and usually attacks Blue's main base and expansions just enough to keep the atmosphere adventurous. The player can assault Yellow either through the gap from the Purple base, by air over the long magma coast, or by a northern ramp near an open expansion. This scenario doesn't have an exact order of events or even an explicitly stated goal. It is intended to give the player freedom to discover the goal and any viable method to achieve it, while fostering a dislike of the Red AI from the stinging counter attacks.
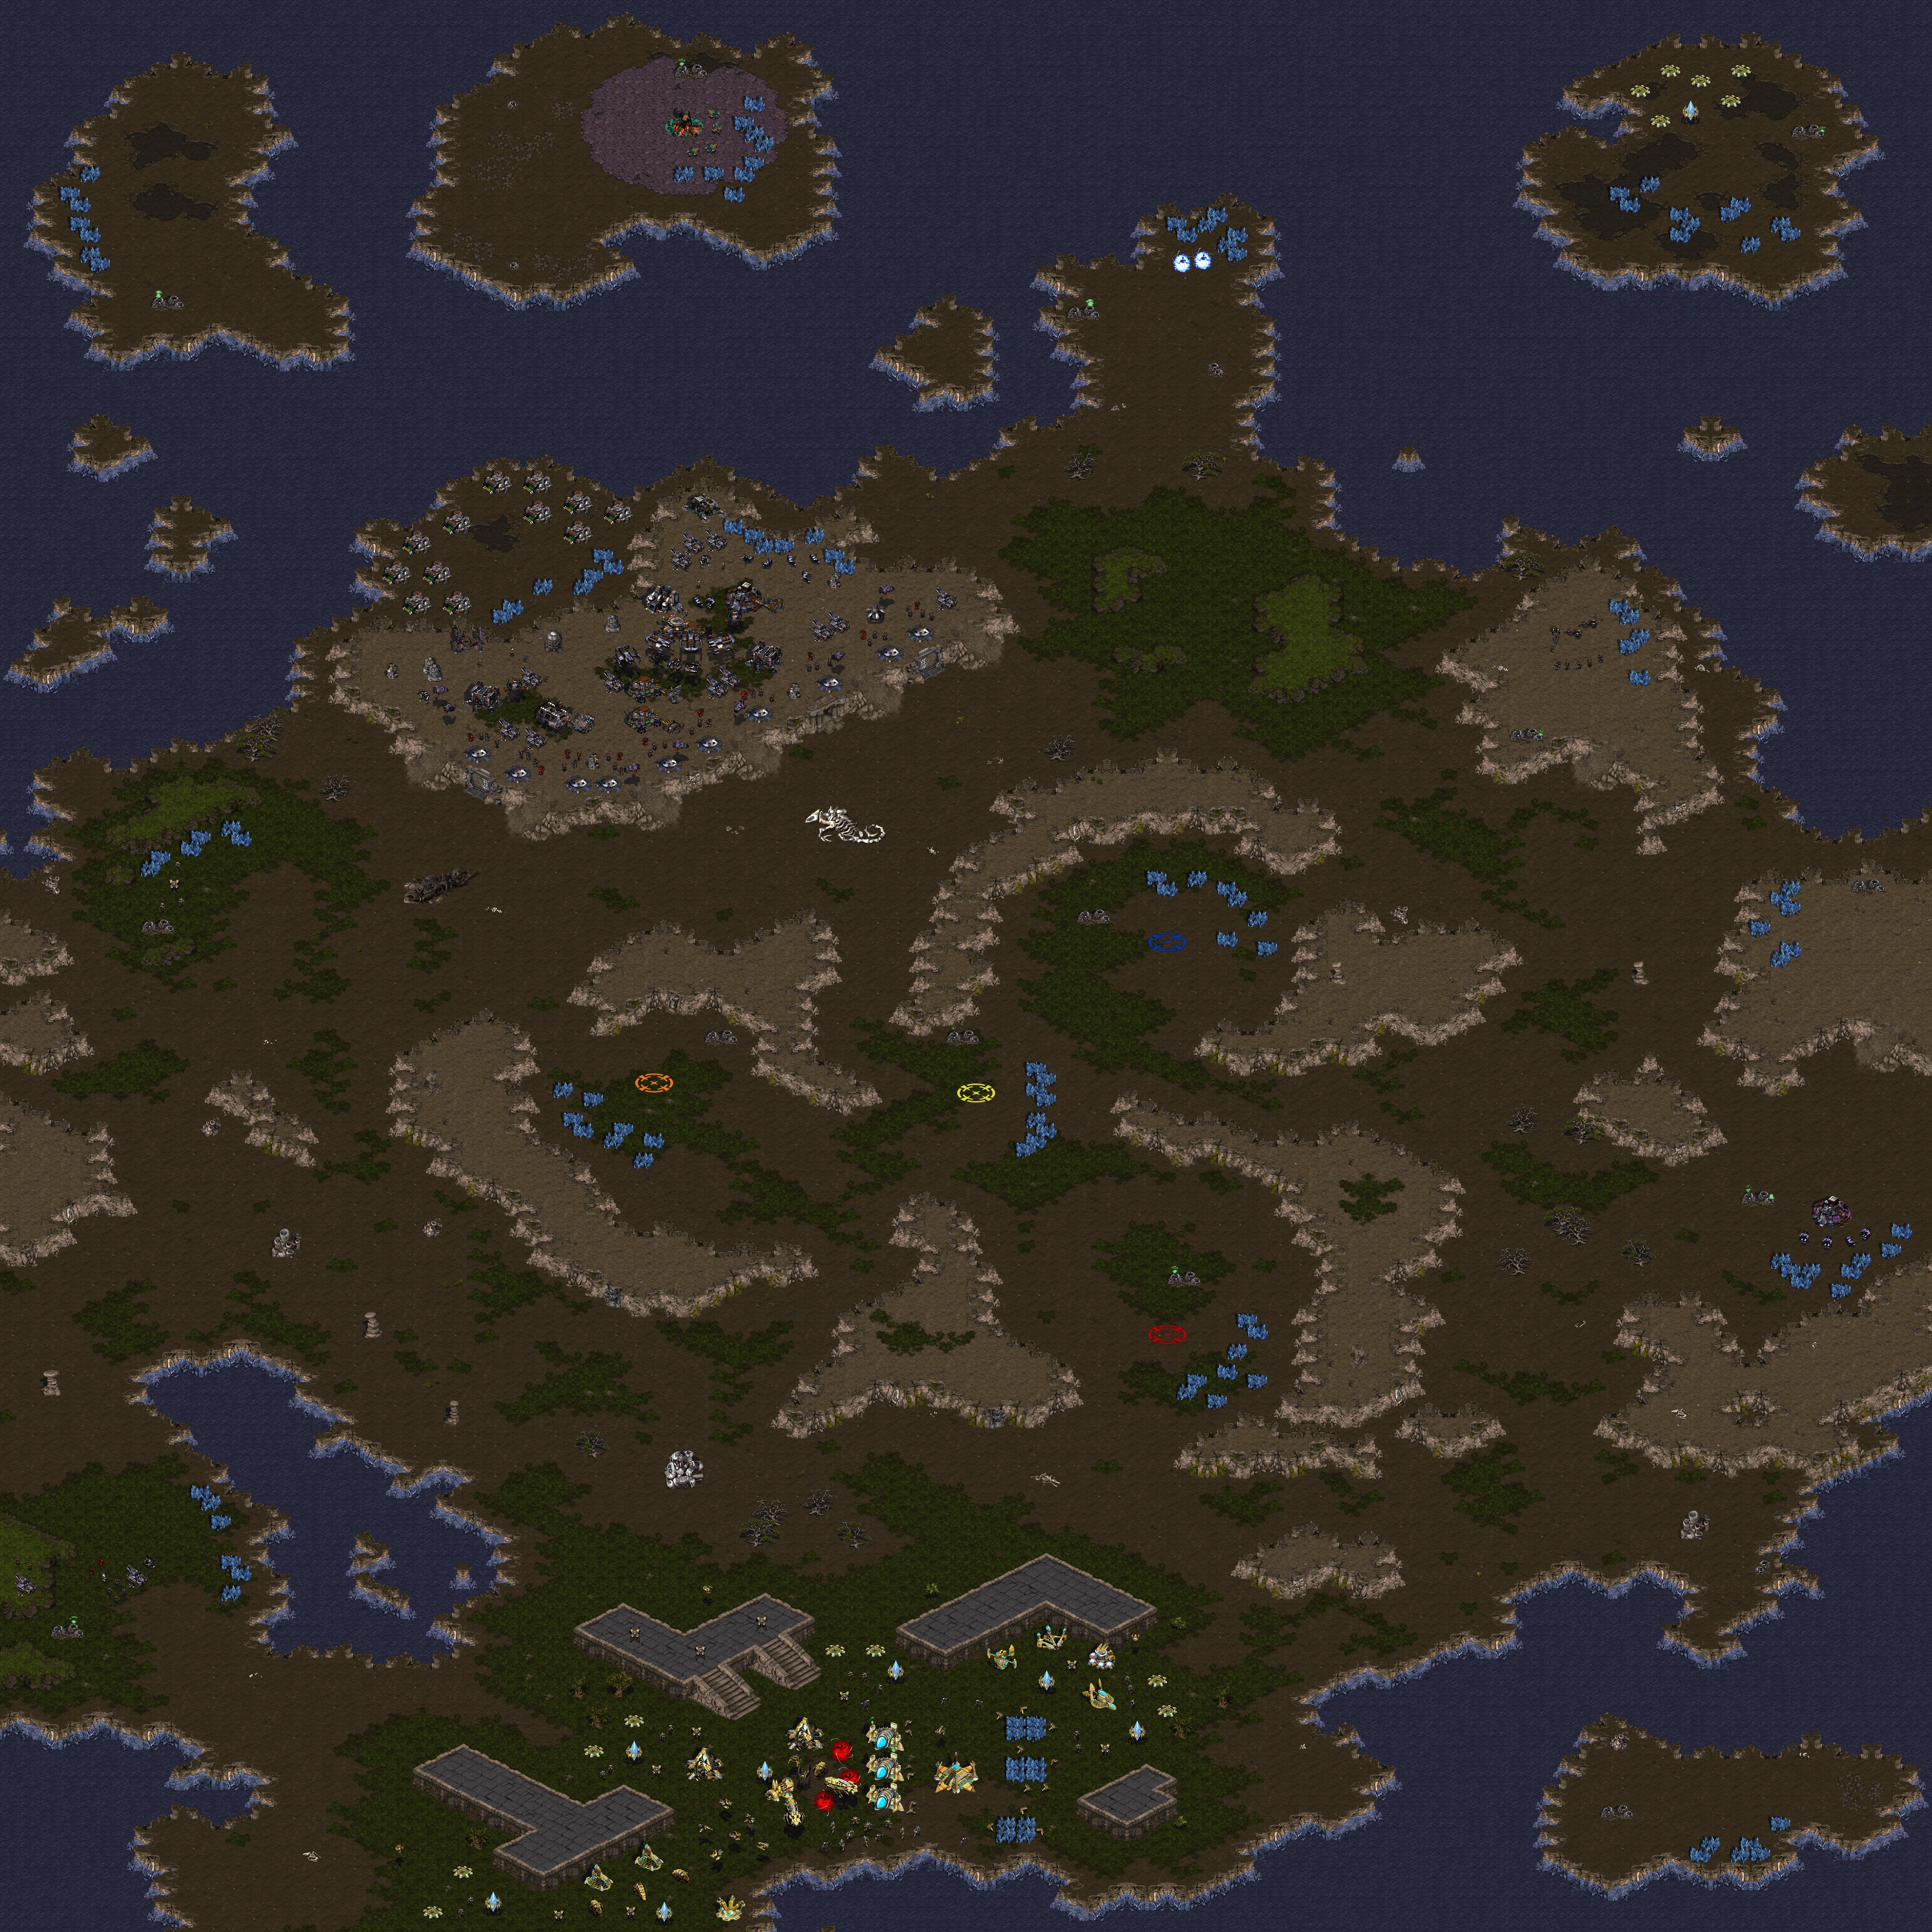
Click for full-sized image.
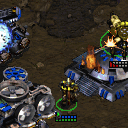
IntroductionGet cozy with your human teammates and keep the computer ruffians out. Design NotesThis map is four human-cooperative versus four AI opponents. The allied human players are situated with normal starting assets in the center of the map with limited space (1). Red, Blue and Orange have well-defined base areas around the perimeter and Yellow sets up in what's left of the middle. The human players must take care not to waste space or interfere too much with their allies' structures during the early game; hence the scenario title, "Breathing Room." The Purple AI (2) is "Terran Custom Level" and will develop at a similar pace to the human players. Purple makes a prime candidate for the first target since they are developing from scratch, are accessible by ground, and have a nice expansion on the cliffs above their starting base. Better to grab the much needed expansion and space (breathing room!) than to let Purple dig in and become a much tougher nut to crack. White is "Expansion Protoss Campaign Difficult" in the temple region just south of the human players (3). They will assemble hefty and sophisticated attacks from an established base, but under the campaign scripts will remain fairly static, sometimes rebuilding razed structures. If the players can weather the opening attacks and tech up they will be more than a match for White later in the game. Brown (4) is static, like White, as "Expansion Terran Campaign Difficult" so over time will become more and more managable. An assault on Brown by ground from the humans' starting area is ill-advised because the ramps to Brown's elevated base are covered with bunkers and seige tanks. A better approach is from the rear of Brown's position that has a staging area and unguarded Supply Depots. The Teal Zerg (5) are running "Zerg Custom Level" and will show up later to the fight since they will either be flying or dropping from Overlords. The Custom scripts start from scratch but will expand to every location that they are able to, eventually. Therefore Teal is the true long-term threat in this scenario in that the players may find them comfortably settled into many expansions mid-way through the battle. Back to the Main Page. |